Welcome to ExamNotes by CertBlaster! This installment looks at the installation and configuration of laptop hardware for A+ Exam 220-1001. Enjoy!
Click here for our A+ Exam Simulator for 220-1001 & 220-1002
With laptops (aka notebooks) and most portable devices, there is a repair vs. replace cost and a convenience balance that always needs to be considered. How much is a replacement? How much better, faster, and cooler is the new device? How much will a repair cost? What would keep you from having to reinstall all of your programs? How recent is your backup?
Please think about this before you go to bed tonight as you ultimately will be called upon to replace individual components regardless of the soundness of the decision. When working on any devices to replace any components, please consider the following guidelines:
1) Make absolutely sure there is no power supplied to the unit. This includes the AC adapter and the battery. Remove both.
2) Review the owner’s manual and/or technical documentation for the device. Download and print the documentation from the manufacturer’s website.
3) The repair/replace process will be different for every manufacturer and even different models from the same manufacturer. Consult the documentation before picking up a screwdriver.
4) Keep the removed screws on a stable surface and separate them by size. You can use a labeled piece of paper or a small case with multiple compartments to organize the screws by the locations they go back to.
The keyboard can be one of the easier components to replace. However, you may need to remove components to get access to the screws. In this example, we will assume the screws are immediately accessible from the top once we remove the plastic faceplate.
The objective is to keep the metal edges of your tool from direct contacting with the easily damaged plastic of the faceplate. Slip your tool into the crevice between the faceplate and pry upwards gently. Remember, these pieces are only held in place by small plastic tabs. They should separate with slight force. If you have to pry hard, stop and reapply using a slight force. Once pried off, move to a different position and repeat. Consult the documentation to be sure there are no screws holding the faceplate down. Once you have begun to separate the pieces, work around the edge of the faceplate until you can lift it up. Before moving the faceplate too far, check to see if there are ribbon cables or other connectors connected to it. If so, do not twist or disconnect the connections. Simply move the faceplate out of your way in order to expose the two to four screws that secure the keyboard. Remove the screws and lift the keyboard up gently until you can see the ribbon cable that connects it to the motherboard.
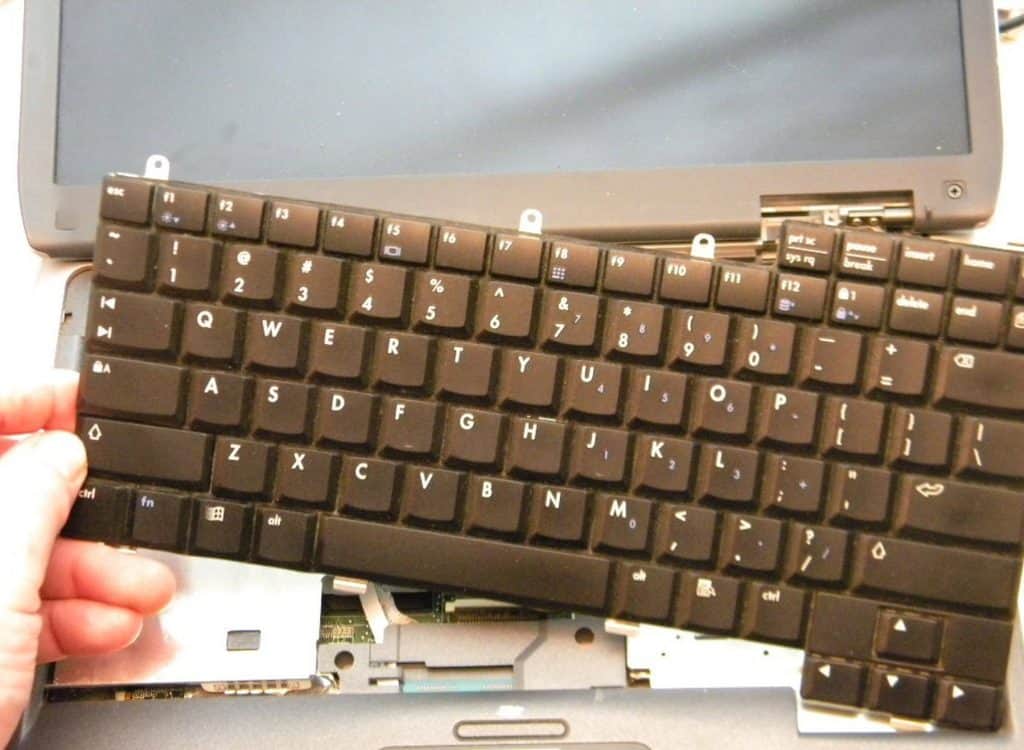
Keyboard removal
Observe the orientation of the cable as one side of the ribbon will be striped. The connectors are ZIF (Zero Insertion Force) type and are released by lifting the tabs at both ends of the connector. If the replacement keyboard came with a ribbon cable attached, remove the original keyboard and cable. If not, release the original keyboard from the cable leaving the ribbon intact on the motherboard. Get the replacement keyboard and insert the ribbon cable in the connector, making sure there are no unintended twists in the ribbon. An intentional twist in the cable will be preexisting, flat, and at a 90o angle. The ribbon cable connector should slip right into the socket. If it does not, check that both end tabs on the connector are fully raised. Insert the cable until you feel it stop and push down on the connector ends to secure it. Secure the keyboard and move the face plate so that it is in position but not snapped in. Power up your laptop and test the keyboard. If the keyboard works, power down the machine and replace the face plate.
Before obtaining your replacement part, start by checking the manufacturer’s website for the exact replacement. Since this would be the perfect time to upgrade, look at your options in terms of drive speed and capacity. This could be the perfect time to upgrade to an SSD (Solid State Drive) or a Hybrid (SSD and HDD). If you choose the SSD, you will be rewarded with faster speed and longer battery life. Be aware of the physical size differences in available drives. If you get a 1.8” drive a 1.8” to 2.5″adapter will ship with the drive. There is quite a noticeable size difference as you can see.
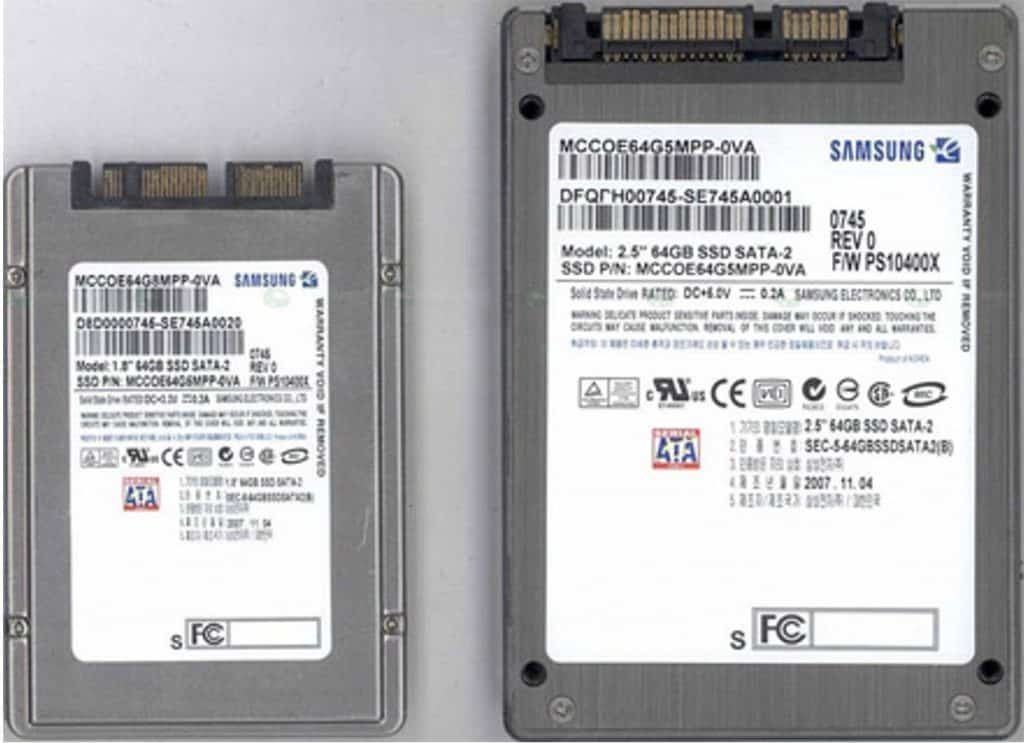
1.8” and 2.5” drives
OK, say you have your replacement drive and are ready to proceed to the next step.
The hard drive is usually accessed by removing a service panel on the bottom of the laptop. You can identify the panel because in most cases, a barrel symbol, indicating the hard drive, will be present on the panel. The panel may also cover the memory and the wireless card. There may be a panel covering only the hard drive. In either case, look for the barrel symbol.
Once you locate the panel, remove the panel by loosening the screws that secure it and pry it up. The screws should stay on the panel by design. When you remove the panel, you will see the hard drive.
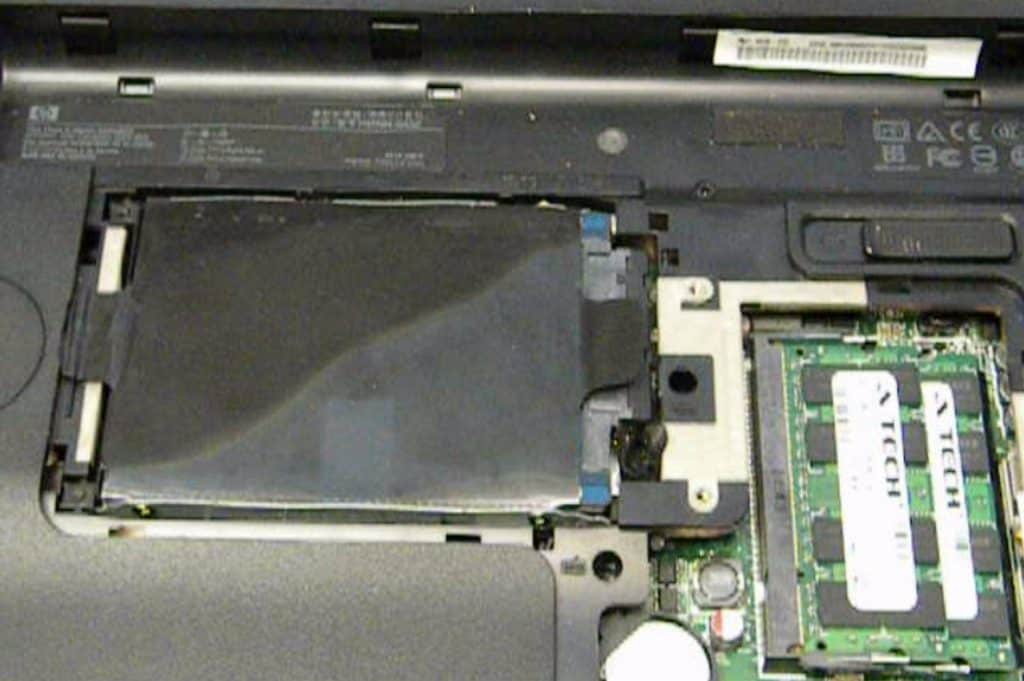
Service panel removed
The drive will be in a mounting assembly held in by two or four screws. In our example, the drive is secured with two screws and a Mylar sheet with lifting tabs on it. Remove the drive assembly carefully and disconnect the SATA connector.
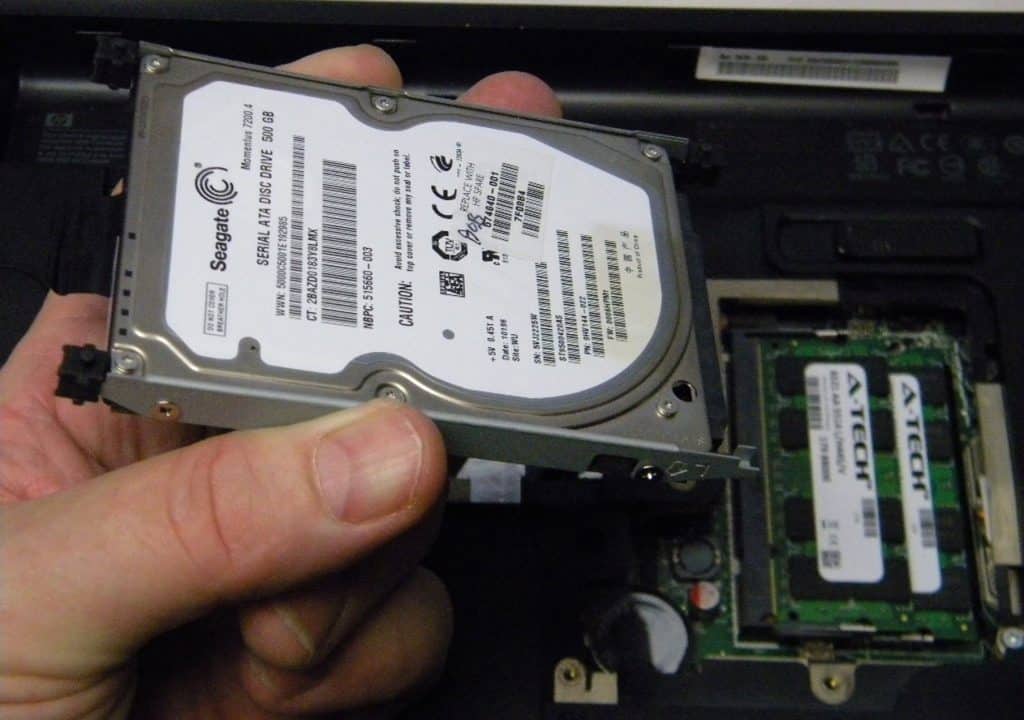
2.5″ HDD in assembly
We see a 2.5” standard magnetic drive. There will be four screws holding the drive in the assembly. Remove the screws and place your replacement drive in the assembly. If the new drive is an SSD, the drive will be 2mm thinner than the 9mm drive you are replacing, requiring a 2mm spacer that will be shipped with the new drive. This spacer ensures the footprint will be the same as both drives are 2.5”. Here is the new SSD drive with a black/yellow 2mm spacer installed in the assembly.
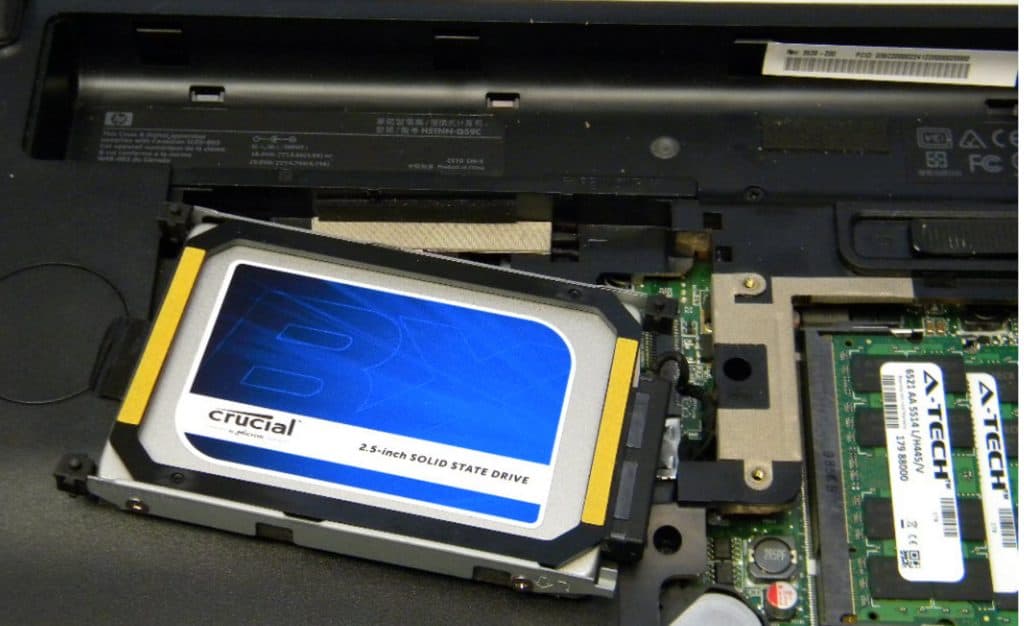
2.5” 7mm SSD in Assembly with Spacer
Mount the new drive in the assembly, reconnect the SATA connector, and replace the drive assembly in the laptop by screwing it back in. Replace the service panel. If you want to check that the drive is being seen, power up the laptop, access the UEFI/BIOS, and look for the disk. Your new drive will not be available to the operating system until it is initialized.
When you are replacing memory, an upgrade is certainly viable. When replacing or upgrading your memory, you must check with the manufacturer for the memory types and capacities your system will accept. It possible that a 4GB DDR3 SO-DIMM from different manufacturers will have the insertion notches in different positions at the edge of the module. Know exactly what you need and get as much as the system will take. Laptop memory is typically installed in pairs so make sure you get 2 modules of the same memory from the same manufacturer.
The installation process requires the removal of the same service panel as that of the hard drive. The pair of SO-DIMMS are held in place by metal clips on both sides of each module. Move the clips outward simultaneously and the module will pop up slightly, enough for you to grasp and remove it. Do this for both modules. Remove your new memory from its packaging and carefully install it by sliding it into the memory slot and pushing it down to seat the module and engage the retaining clips. Here is what it should look like installed. Note the silver retaining clips and the notch in the memory module are perfectly aligned in the socket. Also, note that the palm rest and touchpad were removed to access the memory. Bonus points if you can tell what the difference is between the image and the guidelines provided in the instructions. (Answer: Different memory manufacturers.)
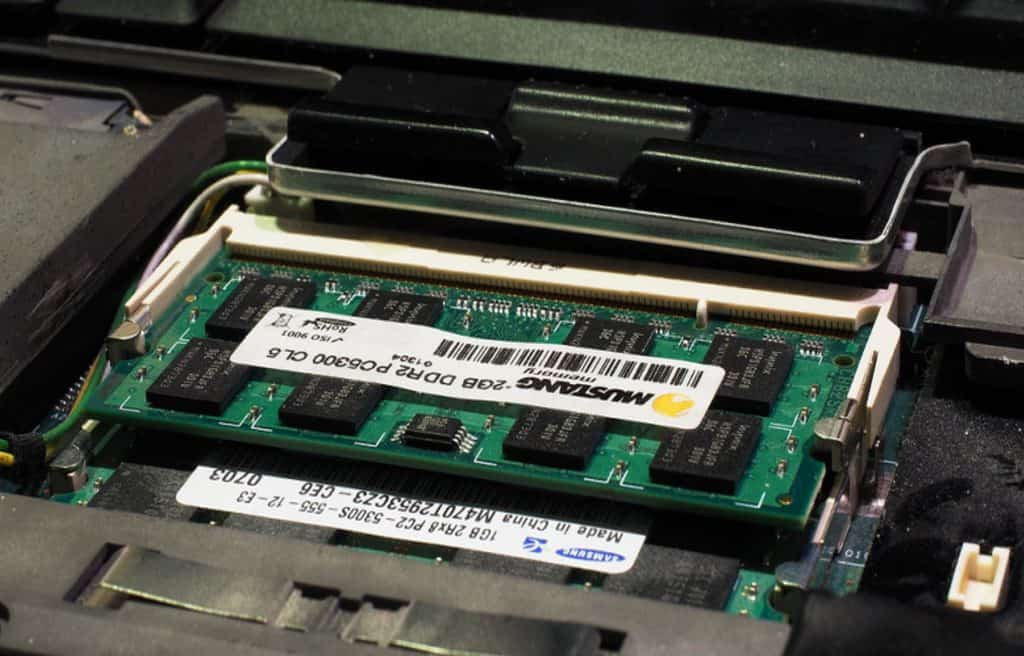
Installed memory
Smart Card readers can be found in business-class laptops that support two-factor authentication through an expansion slot. Before you diagnose a card reader as faulty, try using the card in a different machine. Make sure you have a good card before tearing your laptop down. If you have diagnosed your card reader as faulty, consider a USB replacement as discussed in Part 1 of this objective. Check the documentation. These results will inform you during the replacement decision process. Smart Card readers provide access to the laptop as part of two-factor authentication. They are found with, or in replacement, of memory card readers on the laptop. Card slots can be in either a double door flap type opening, for Compact Flash, or a single, open slot of a specific size depending on which Smart or SD card type you are using. The SD cards and readers are also covered in objective 3.4 Given a scenario, select, install and configure storage devices. In either case, the reader will be pretty deep in the laptop unit. Usually, the best way to access it is through the top by removing the keyboard and the bezel. Some card readers can be accessed through a bottom panel while others could be soldered to the motherboard. Check the ribbon cable for damage and use the one that came with replacement if supplied. Reverse the disassembly process to close up the case. And finally, make sure all of the screws are back in the right places.
An Optical drive used to be pretty tough to access. Fortunately, later laptop models hold the drive-in with a single screw to an assembly that has SATA connectors fitted into it. Otherwise, you may be able to get to the drive from the bottom service panel or you’ll have to have to disassemble from the top. Follow your instructions carefully. Generally speaking, the Optical drives that use a slide-out tray are easier to remove than the slot insertion type.
When replacing a wireless card, there is always the USB option. In this discussion, we will discuss internal expansion options with the addition of a Mini PCI slot followed by a Mini-PCIe slot. Here is how they compare.
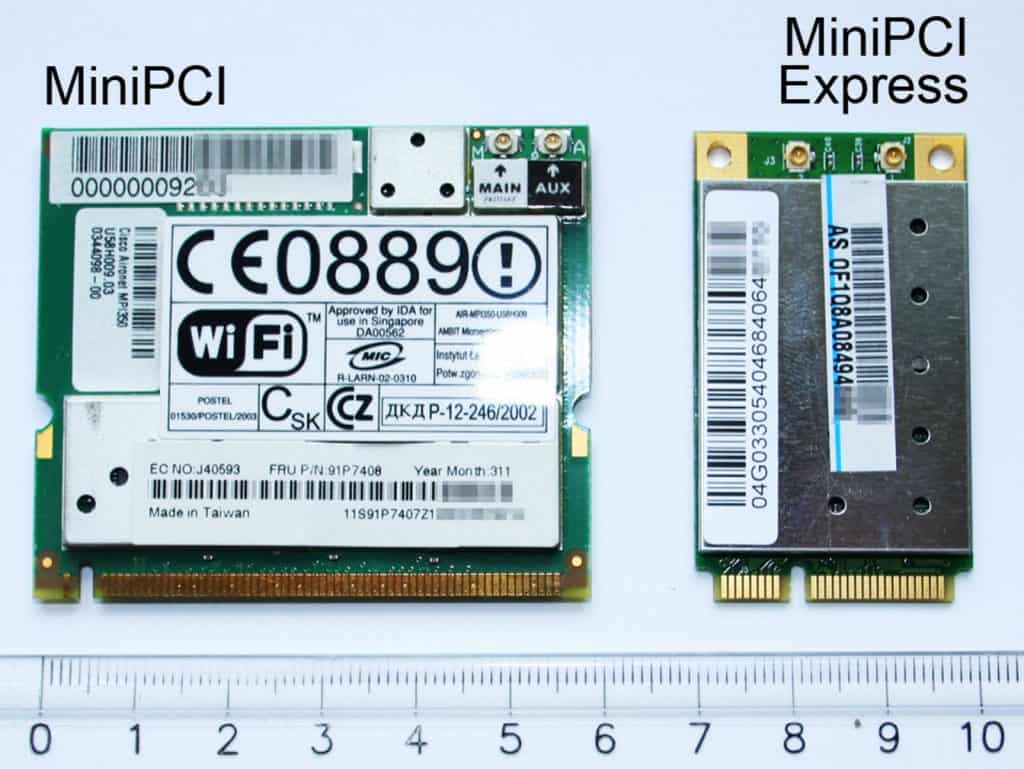
Mini-PCI to Mini-PCIe Comparison
Mini-PCI allows manufacturers to adjust the laptop features to user needs without designing a new laptop. This slot works the same way as in desktops, only on a much smaller scale. Always accessible through a service panel, the Mini-PCIe slot is USB 2.0 compliant and can be used to increase storage capacity, add Bluetooth, or add/upgrade wireless capabilities. This was a common issue as a user with a decent laptop and a 802.11 b wireless card would need to swap out for a 802.11g or 802.11n card. While the card was easy to swap out, the wireless upgrade required patience because the internal antennae on the card have tiny F type connectors that take time and care to connect. Here is a Mini-PCIe wireless card ready to be installed. Note the black slot and gold antenna connectors. Once connected, the card will also be screwed in.
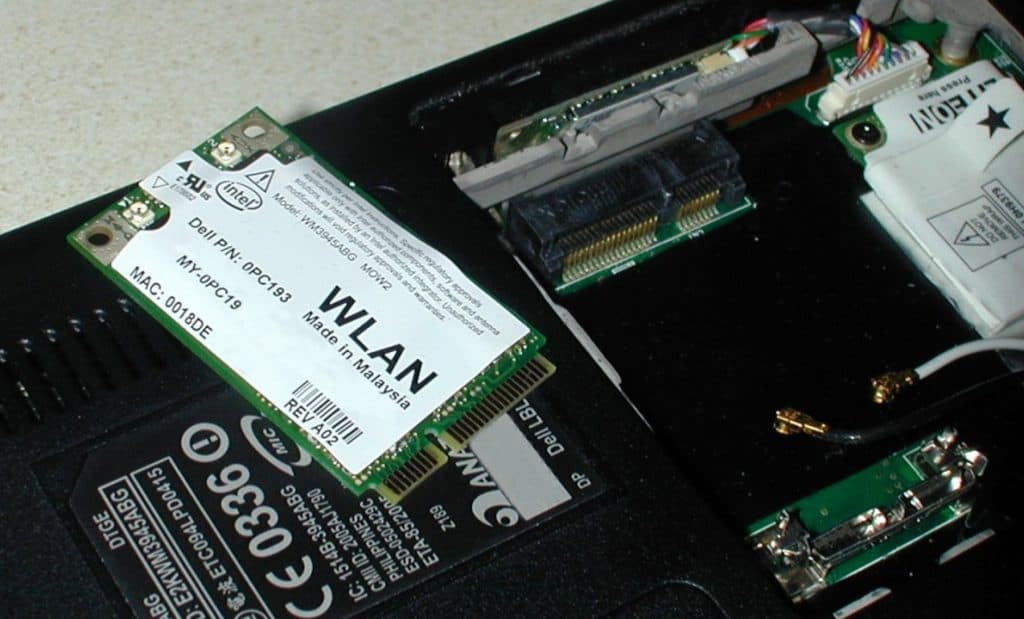
Mini-PCIe Wireless Card
The laptop lid is the most distinguishable component. The laptop lid contains the backlight, the inverter that converts the DC power in the laptop back to AC power, and the LCD screen. The LCD is secured to the lid with screws. The inverter is easily accessible once you have removed the bezel. The lid will be secured to the laptop body with two hinges that are typically accessed by gently removing a faceplate with curved extensions which protect the hinge and any cabling.
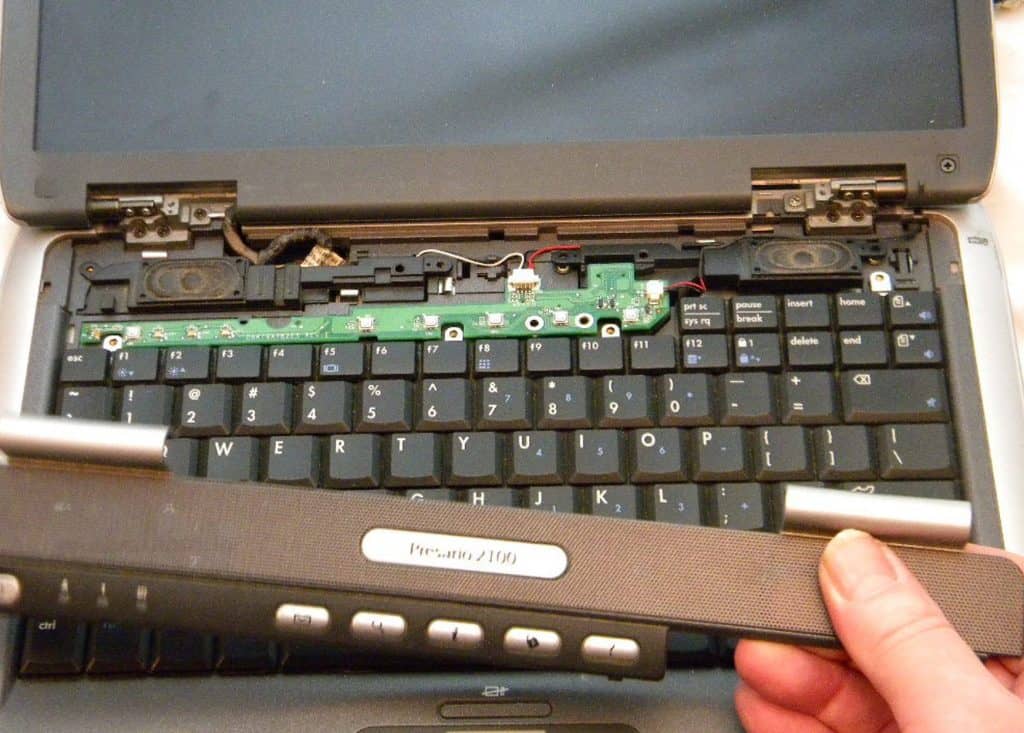
Laptop Faceplate with Hinge Covers
Once the faceplate is off, you’ll see the power and monitor cable. This should detach easily. If it doesn’t, stop and double check your instructions. Once the lid is free, you can now work on it. First, remove the bezel. It will be secured by four screws that are hidden under rubber plugs at the corners. Next, pry the bezel loose, working slowly and gently. Once the bezel is off you will see the components. If you are not working on the screen, be careful. If you are replacing the screen, be careful with the new one. The screen will be secured by screws around the outer edges (four to six). Remove the screws but don’t move the screen more than a ½ inch or so as the ribbon cable for the screen is delicate and deliberately short. You may also find a wireless antenna disconnect too. Follow your instructions carefully and if replacing the screen, use the new LCD ribbon if possible. After reconnecting everything and securing the screen, check your work quickly by powering and booting the machine. Don’t handle the machine here. Just observe for any problems and power down. Reassemble it all carefully, reversing the process.
Please be absolutely sure that the DC jack, or charging port, has failed before you replace the jack. Make sure the AC adapter isn’t the issue too. Check the DC jack using a voltmeter by moving the testing wire around to ensure roughly +12V DC is showing consistently. DC jack replacement could involve a significant laptop body tear down to access and remove the jack through de-soldering. In this case, you will need solder, a good soldering iron, and a de-soldering wick to absorb excess solder. Depending on your laptop’s design, you may find the jack on a small circuit board connected to the motherboard by a ribbon cable. This is the ideal scenario if jack replacement is necessary. We recommend that you take pictures or precise notes. Keep track of your screws, components, and their orientation for reassembly. Don’t heat the jack connections for a long period of time as you don’t want to damage the board. Be sure your soldering iron is hot and you have the de-soldering wick ready. Remove the broken jack and replace it. Reassemble the laptop.
Batteries are the easiest replacement of all. Obtain the exact battery you need, preferably from the manufacturer. Use genuine parts if available. Release and remove the old battery and replace with the new one. The new battery should fit exactly using the original latch as the old battery. If possible, it is advisable to do this at a time when you won’t be using the laptop for several hours as it’s important that the battery is completely charged before the first use.
If your touchpad has failed, you can consider an external USB mouse or trackball. Otherwise, this is another component that can be installed several ways. The touchpad will be integrated with the palm rest. After reading the instructions, locate and remove the screws that hold the touchpad and possibly the keyboard. Disconnect the touchpad connector from the motherboard by pulling the connector. Do not pull the wires or ribbon. Reverse the process to install the new touchpad. Some models may have the touchpad screwed and glued onto the palm rest. For these, you may need to replace the palm rest entirely. Otherwise, you’ll have to carefully pry the old touchpad off of the palm rest after removing any screws. Be careful not to damage the palm rest. Work around the edges of the old touchpad. Carefully remove all of the old adhesive from the palm rest. There should be adhesive with your replacement part, or a recommendation. Make sure the new touchpad is as flush as possible so that there is no space between the touchpad and palm rest. The reattachment process should be documented by the manufacturer. Use only genuine parts.
Speaker replacement is a relatively simple repair. Correctly diagnose the problem and be sure you have the right drivers in the operating system. If the issue is no sound, the problem could be as simple as a loose wire. The speakers are usually installed under the faceplate. Typically the speakers will be above the keyboard with an assortment of controls, like the power button in particular.
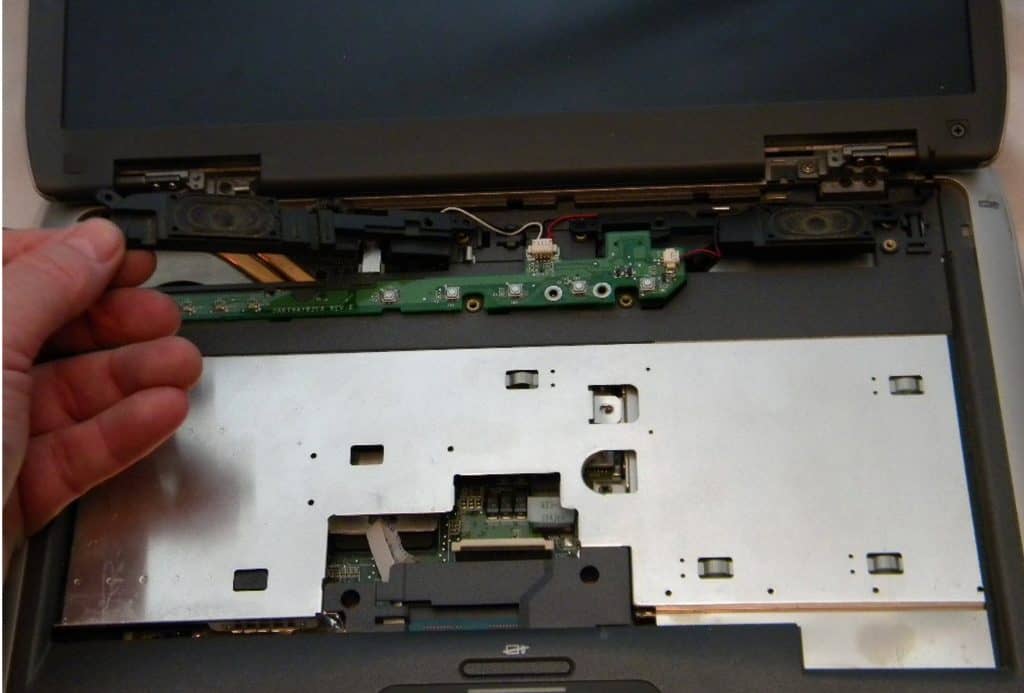
Speaker Above the Button Control Board
Click here for our A+ Exam Simulator for 220-1001 & 220-1002
The speakers could also be below the keyboard with the touchpad. In any case, be careful not to break any connections. When buying replacement parts, get a pair of speakers since if one has failed, the other could be near the end of its life. Matched speakers will provide a better experience. Locate the speaker connection which could be on the motherboard or on a separate sound board. There will be a pair of wires on the connector. Remove the connector from the board using the connector and not by pulling the wires. Be careful of other connections involved. Very often, the buttons on the top faceplate simply line up with the actual buttons soldered to the control board.
Replacing the System Board is the type of situation that really challenges the repair vs. replace decision. The replacement requires a complete teardown of the unit. The system board or motherboard is under all of the peripherals and system components. It will have components on both sides: CPU on top, memory and expansion on the bottom. This will be your ultimate test of documentation and procedure. If you remove the screws from something and it doesn’t move, flip the case over and see if there is another screw or two still holding it. The organization and documentation of the screws in particular is critical. There’s nothing worse than your last screw being the wrong size. Take pictures and use nonconductive labels to help reassemble the unit. You will be taking everything apart except the LCD screen so give yourself at least an hour or two of uninterrupted time. Here’s a nice comparison of a notebook and a standard ATX motherboard:
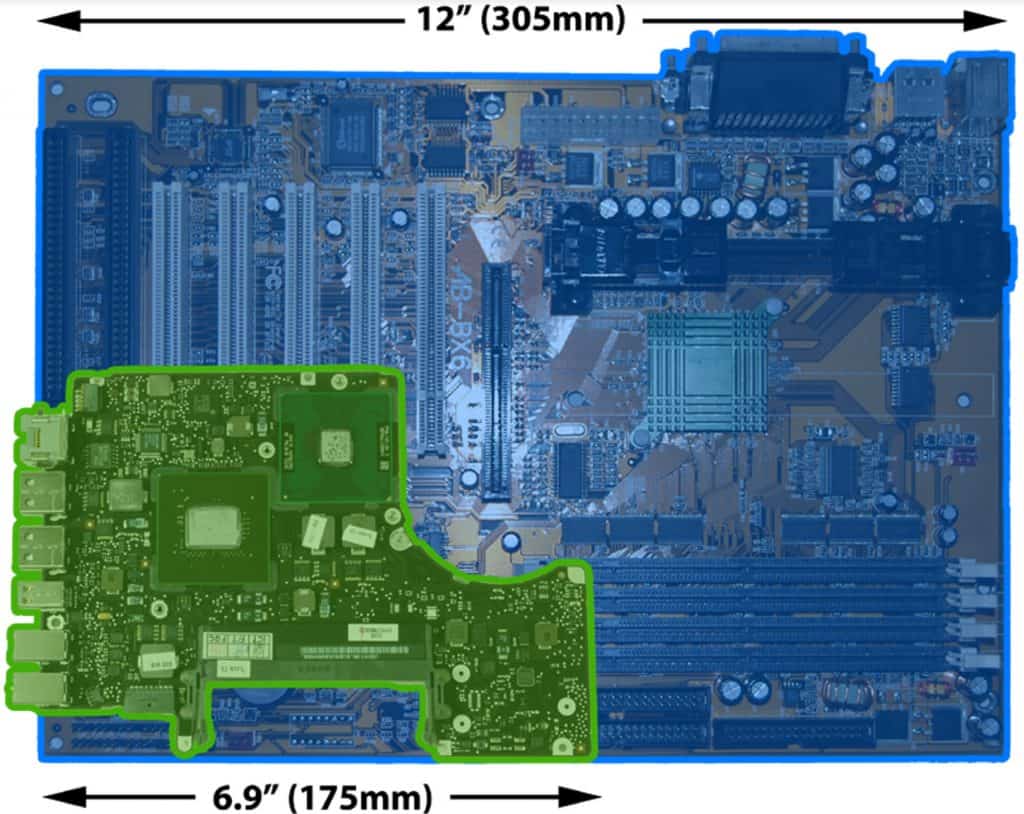
ATX and Laptop System Boards Comparison. Photo curtesy of Kyle Wiens [ifixit.com] and Max Tomchenko.
This is a test! You’re looking at probably four screw sizes and lots of little connections. Take the laptop apart slowly and deliberately. Take notes, use your cell/smart phone camera, and give yourself every aid possible. A small compartmented storage container will work. Even an empty egg carton would be ideal here.
The CPU replacement is not as tough as it would seem. It is also an opportunity to look at possible upgrade options using manufacturer recommendations. Select the best match considering cost and performance. The heat sink should be visible after removing the keyboard and bezel assembly. Because the height is not available as it would be in a conventional PC, you’ll find that the heat exchange assembly occupies up to one fourth of the surface area of the system board, using copper piping to get the processor heat to the fan in a single long flat package. Once the heat exchange assembly is removed, the processor will be visible. Here we see both the processor and the heat exchanger. Note the old thermal paste still stuck to the processor and the bottom of the heat exchanger. Be sure to clean the old thermal paste off both surfaces.
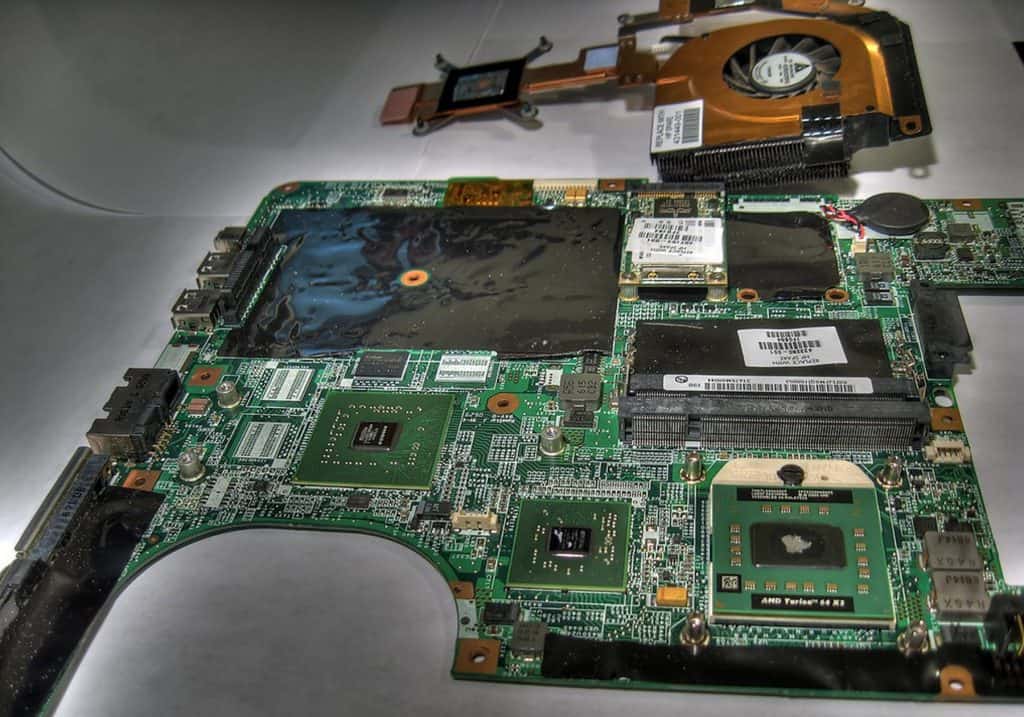
Motherboard Processor and Heat Exchanger
Remove the old processor and replace. Make sure you have thermal compound or a thermal pad between the new processor and heat sink for even heat distribution.
Well, that’s all for the first sub-objective 1.1. Good luck on the test!
Click here to go back to the A+ Main Domain 1.0 Table of Content
Click here for our A+ Exam Simulator for 220-1001 & 220-1002

By continuing to browse this site, you accept the use of cookies and similar technologies that will allow the use of your data by CertBlaster in order to produce audience statistics- see our privacy policy.